Create A Fault Tolerant App Using Azure App Services And Azure Sql
- 24 Jun 2019
Azure guarantees 99.95% uptime or better, but sometimes your application or database misbehaves due to something you have done (written bad code) or in the rare event there is a problem in a region. There was not a good end to end sample of setting up an Azure App Service that was deployed to multiple regions to be responsive and that utilized auto failover if a resource or data center went down so I created this one! This will illustrate how you can quickly and easily lay the foundation for a Geo-Distributed application in Azure built on Azure App Service, Azure Traffic Manger and Azure SQL.
Architecture
This sample is an ASP.Net application that reads and writes to a SQL Database. Azure Traffic manager will allow us to serve the application from two regions and it will pick the region closest to the client for better performance. If one region fails, then traffic manager will route only to the region that is healthy providing failover. Similarly, we will have read and write operations to the SQL Database handled by a SQL Failover group. If a SQL Database in one region is not available due to a disaster in a certain region, the requests will go to the failover database.
Prerequisite
You need to have an Azure Subscription. You can get a trial subscription here: https://azure.microsoft.com/free/
Walkthrough
Create a new Resource Group
All of the resources we will use will be logically grouped in a Resource Group to allow us to easily identify the Azure Resources associated with this walkthrough. This will also allow us to clean up all the resources easily when done. The resources you will create are expensive and you will want to delete these after this exercise if you do not intend to use this setup in a real environment!
To do this, navigate to the Azure Portal and login using your subscription. Then click on the green + icon in the top left of the screen and type ‘Resource Group’ in the search box:
Press Enter on your keyboard and click the ‘Create’ Button in the next screen.
If you have multiple subscriptions pick the appropriate one, Name the group ‘FailoverExample’ and create it in the (US) East US region. Click the ‘Review + Create’ button:
Click the ‘Create’ button in the next screen and quickly the Resource group will be created!
You can open the resource group by clicking the notification (Bell) icon on the right and choose ‘Go to resource group’
At this point you will have no resources:
Create SQL Database
Now create the Azure SQL resource we will need in the Resource group we are viewing (and just created). Click on the ‘+ Add’ in this view as pictured below:
Type ‘SQL Database’ in the search box, press you enter key and select ‘SQL Database’
Click the ‘Create’ button in the next screen and start filling in the information below. Ensure you select the ‘FailoverExample’ Resource group we created and set the Database name to ‘eastdb’:
For the Server field click ‘Create new’ and give the server a unique Server name, an admin login name and password, and create it in the East US location. Make sure you save or remember the Server admin login and password. Then click the ‘Select’ button at the bottom to select your changes:
Accept the defaults for the rest of the values and click the ‘Next : Additional settings >’ button. You don’t need Advanced Data Security so select ‘Not now’. Then click the ‘Review + create’ button and then click the ‘Create’ button in the next screen. This will start the deployment of the database (which will take some time).
Once completed you can see the SQL Database and Server in your Resource group:
Add a Failover Group for your SQL database
Click on the SQL server name to navigate to that server. Click on Failover groups and click the ‘+ Add group’ icon:
Create a new failover group and Create a new Secondary server in a different region (I am using South Central). Ensure the Username and password are the same as the one you used for your first database server!
Click the ‘Select’ button and then click ‘Select databases to add’ to select the database we created earlier (eastdb for me):
Click ‘Select’ and then in the next screen click ‘Create’ to start the failover group for your database (this will take some time).
Create Azure App Services
You will create a web app in two different regions. We will use East US and South Central US regions just like our databases for performance reasons.
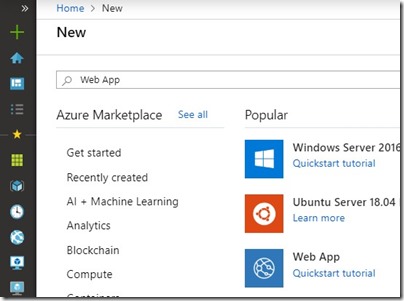
Open the Azure Portal and click on the green ‘+’ icon and type Web App in the search bar, then click on the Web App text (not the Quickstart tutorial):
Select our Resource group called ‘FailoverExample’ and enter a unique webapp name (I suggest your alias appended with ‘eastapp’) for example: jsandersfailovereastapp
Choose the runtime stack and Region as shown below and create a new App Service plan with Sku and size Standard S1:
Click on the next tab ‘Monitoring’ and select ‘No’ for application insights (we will not be using it) and then click on ‘Review and create’ and in the next screen click on the ‘Create’ button to create your web app
Now create a second web app in another region (I suggest South Central US) in the same Resource group (FailoverExample) like you did above. See the example below:
##
Configure App Settings for database connections
The code we will deploy to the Azure Web apps will need an application connection string added do the Configuration in the portal so that it can connect to the database. The connection string we will set is ‘WriteDbConn’
We need to get the connection string from the Database we will use and save it to an editor like notepad. Go to our new Resource group you created at the beginning and click on the database server you created initially. In my example you will see the highlighted SQL server is the one I created first (jsanderseastserver):
Click on Failover groups and then your failover group you created above to get to the configuration details page that looks like this:
Copy the Read/write listener endpoint to your editor.
Now you need to navigate to the database and get the connection string. Go back to the resource group and click on the SQL Database you first created (eastdb is mine). Click on the Connection strings section to see the ADO.NET connection string.
Click on the Copy icon on the far right side and paste this string into your text editor:
We need to edit the connection string for the application. You will need to replace the database tcp: value with the failover group information, {your_username} text with the Server admin login you saved when you created the server and the {your_password} text with your password (no { } characters) and you will use that for the WriteDbConn setting value. Here is an example:
Server=tcp:jsandersfailover.database.windows.net,1433;Initial Catalog=eastdb;Persist Security Info=False;User ID=jsanders;Password=awesome_password;MultipleActiveResultSets=False;Encrypt=True;TrustServerCertificate=False;Connection Timeout=30;
Go back into the resource group and navigate to the first web app in the East US region you created and go to the Configuration section and click on the ‘+ New connection string’ section:
And add a connection using the Name ‘’WriteDbConn’, Value of the Connection string you just modified above and choose the type ‘SQLAzure’ and click update to save:
Do this for your second app in the Central US region since both apps need to write to the Primary Database (not the backup).
Deploy code to Azure Web Apps
Now we will deploy a test app through the SCM site for each Web App using this zip file: https://github.com/jsandersrocks/FailoverSample/raw/master/wwwroot.zip Download the zip file local in you downloads directory.
Go to the Resource group you just created by clicking on the resource group icon and then clicking on the new resource group you created for this walkthrough.
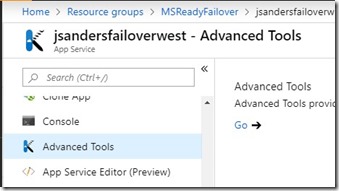
Click on the first App Service you created, scroll down to Advanced Tools and click on the ‘Go’ link: (Expert tip: The Kudu interface is simply https://yourwebappname.scm.azurewebsites.net)
This is the Kudu console where you can drag and drop the code for your web app.
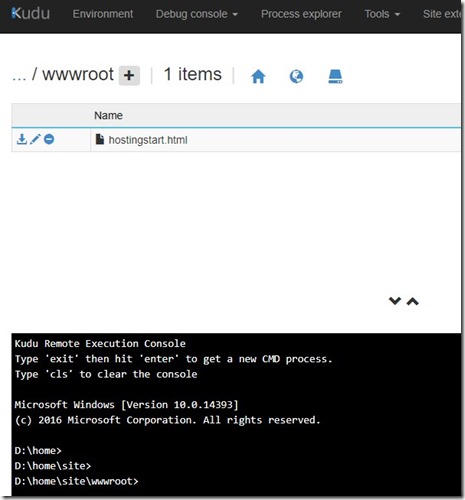
Click on ‘Debug Console’ and choose ‘CMD’
Click on the text ‘site’ then ‘wwwroot’ in the tree view to navigate to the wwwroot folder as shown:
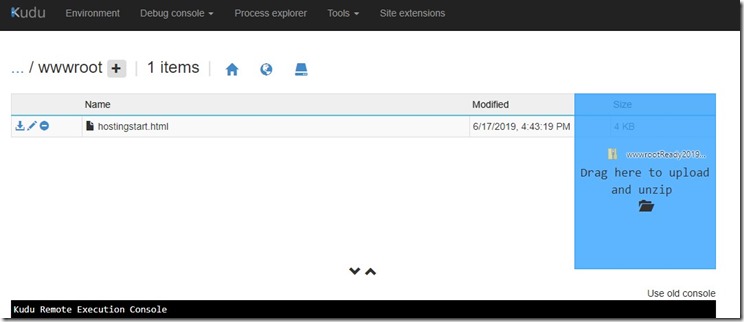
Drag and drop the zip file from above onto the folder as shown:
Do these same steps to deploy your code to your 2nd Web app!Test both apps. When you run the Web App it creates the appropriate table in the database (Entity Framework provides this magic for us). You should be able to insert records and refresh the display to see items in the listbox in both applications (east and central) and you should see the same data when you refresh the view.
Create and configure Azure Traffic Manager
Now we will use Azure Traffic Manager to show how it can be used to route traffic to healthy instances of your applications, route to the closest region for better client performance and provide failover.
Again from your Resource group click the ‘+’ icon and this time type ‘Traffic Manager profile’ and then press enter. Then select the Azure Traffic Manager profile resource and click the Create button:
Fill in a unique name and choose the default ‘Performance’ Routing method. Ensure your Subscription and Resource group are the same as the rest of your work and click the ‘Create’ button:
FYI: Performance routing is only one mode (the one we will use) https://docs.microsoft.com/en-us/azure/traffic-manager/traffic-manager-routing-methods#performance-traffic-routing-method
Once this is created, go to that resource and click on ‘Endpoints’ to add your two Web Apps as endpoints:
Then set the type to ‘Azure endpoint’, give the endpoint a name, set the ‘Target resource type’ to ‘App Service’ and select the first Web App you created and click the ‘OK’ button:
Do the same for the 2nd app in the other region and when complete you should have two endpoints listed:
To ensure Traffic Manager is serving your requests correctly retrieve the Traffic Manager URL and use it in the browser to access your app. The DNS name you will use is available in the Overview of the Traffic Manager profile:
Since we are using ‘Performance’ routing you should be directed to the nearest healthy endpoint. The app you create will tell which server you are hitting at the bottom of the listbox:
##
Completed Architecture
This is what your app architecture looks like now:
Traffic manager will route Users to the closest of the two regions (as long as they are both working). Hidden are the details of how the Database Failover group will provide a connection to the primary database via DNS just like Traffic manager does for the web app.
Test Traffic Manger Failover to you app
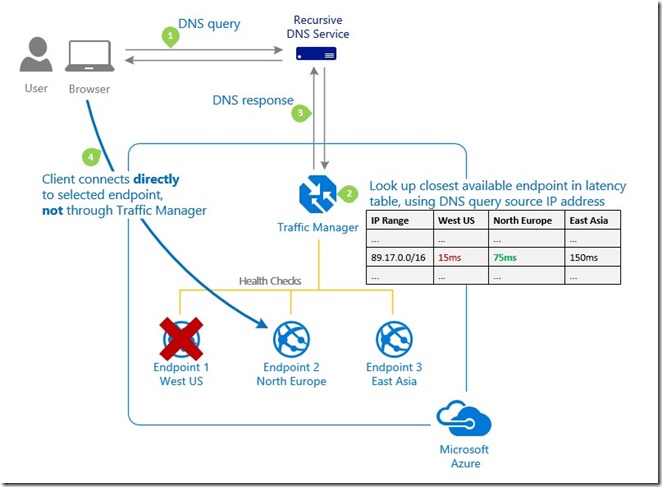
It is important to note that Traffic Manager is a DNS service. Traffic Manger will serve up the IP address of the closest endpoint and hand it back to the Client computer. Once it does that, Traffic Manger has no further involvement for that session unless the DNS TTL (Time To Live) value is exceeded.
You can change the DNS TTL value in the Configuration section of Traffic Manager. A description of this is also available by hovering your mouse over the information icon:
The TTL determines how long a client will use the cached IP address and until the TTL expires a client will attempt to use the old IP address. See: https://docs.microsoft.com/en-us/azure/traffic-manager/traffic-manager-how-it-works
The lower the TTL setting, the increased frequency a client computer needs to poll for DNS resolution again so choose this value carefully if you decrease it, as this may have performance impact trying to resolve your site.
Ref: https://docs.microsoft.com/en-us/azure/traffic-manager/traffic-manager-monitoring
“Because Traffic Manager works at the DNS level, it cannot influence existing connections to any endpoint. When it directs traffic between endpoints (either by changed profile settings, or during failover or failback), Traffic Manager directs new connections to available endpoints. However, other endpoints might continue to receive traffic via existing connections until those sessions are terminated. To enable traffic to drain from existing connections, applications should limit the session duration used with each endpoint.”
Test
Stop the app in region you are currently hitting (the application page shows name of web app being used). For my example I will go to my app in the east region and select the ‘Stop’ icon:
You have removed the application closest to you and Traffic Manager will redirect the DNS to the working application:
After the TTL period you will see that you are redirected to the other region. Type in your Traffic Manager DNS name again and verify you are going to the geo-region furthest from you:
If you do not want to wait for the TTL to redirect traffic, then you can open an administrative command prompt on Windows and type ipconfig /flushdns, Note: if you are using Chrome, it caches DNS entries internally and does not use the client computer cache: ipconfig /displaydns will show no entries! Open an incognito web browser to get around this or go to <chrome://net-internals/#sockets> and ’Close idle sockets’ and ‘Flush socket pools’ then <chrome://net-internals/#dns> and ‘Clear host cache’
Start the Web App you had stopped previously to ensure it is working again.
Simulate Azure SQL Db failure
Go to your Azure SQL Server and go to the Failover group again.
Click on the Forced Failover icon:
Once complete you will notice the primary database has changed to be the other region and this works seamless with your application. That is because the failover group points to the DNS of the failover group and not the actual Database:
There are further implications to failover that are covered in the Advance Topics section links below
#
Delete the resource Group
Now that you have finished this exercise you will want to delete the resource group you created in the beginning. This will delete the resources you created in this walkthrough and prevent the costs from mounting. Another option would be to downgrade the sku you are using for the individual resources to reduce the cost. Simply go to your resource group and select the delete icon at the top!
Summary
You were able to quickly build and demonstrate how failover mechanisms can be used in Azure. This is only touching the surface for this topic but I trust this has given you enough information to demonstrate and get started with using Azure App Service, Traffic Manager, SQL Db and Failover groups!
##
More information and Advanced Topics
DNS Resolver: https://www.digwebinterface.com/
Standby architecture and other considerations: https://docs.microsoft.com/en-us/azure/architecture/reference-architectures/app-service-web-app/multi-region
SQL Security (My sample code needs dbmanager, read and write): https://docs.microsoft.com/en-us/azure/sql-database/sql-database-manage-logins
SQL Azure failover groups: https://docs.microsoft.com/en-us/azure/sql-database/sql-database-auto-failover-group
SQL HA: https://docs.microsoft.com/en-us/azure/sql-database/sql-database-high-availability
Traffic Manager: https://docs.microsoft.com/en-us/azure/traffic-manager/traffic-manager-monitoring https://docs.microsoft.com/en-us/azure/traffic-manager/traffic-manager-how-it-works
<< Go Back


